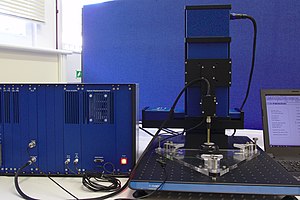
Kelvin probe force microscopy (KPFM), also known as surface potential microscopy, is a noncontact variant of atomic force microscopy (AFM). By raster scanning in the x,y plane the work function of the sample can be locally mapped for correlation with sample features. When there is little or no magnification, this approach can be described as using a scanning Kelvin probe (SKP). These techniques are predominantly used to measure corrosion and coatings.
With KPFM, the work function of surfaces can be observed at atomic or molecular scales. The work function relates to many surface phenomena, including catalytic activity, reconstruction of surfaces, doping and band-bending of semiconductors, charge trapping in dielectrics and corrosion. The map of the work function produced by KPFM gives information about the composition and electronic state of the local structures on the surface of a solid.
History
The SKP technique is based on parallel plate capacitor experiments performed by Lord Kelvin in 1898. In the 1930s William Zisman built upon Lord Kelvin's experiments to develop a technique to measure contact potential differences of dissimilar metals.
Working principle
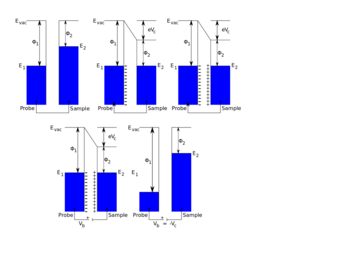
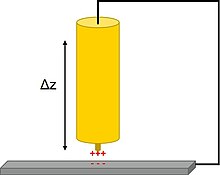
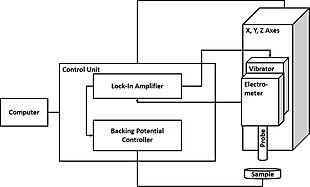
In SKP the probe and sample are held parallel to each other and electrically connected to form a parallel plate capacitor. The probe is selected to be of a different material to the sample, therefore each component initially has a distinct Fermi level. When electrical connection is made between the probe and the sample electron flow can occur between the probe and the sample in the direction of the higher to the lower Fermi level. This electron flow causes the equilibration of the probe and sample Fermi levels. Furthermore, a surface charge develops on the probe and the sample, with a related potential difference known as the contact potential (Vc). In SKP the probe is vibrated along a perpendicular to the plane of the sample. This vibration causes a change in probe to sample distance, which in turn results in the flow of current, taking the form of an ac sine wave. The resulting ac sine wave is demodulated to a dc signal through the use of a lock-in amplifier. Typically the user must select the correct reference phase value used by the lock-in amplifier. Once the dc potential has been determined, an external potential, known as the backing potential (Vb) can be applied to null the charge between the probe and the sample. When the charge is nullified, the Fermi level of the sample returns to its original position. This means that Vb is equal to -Vc, which is the work function difference between the SKP probe and the sample measured.
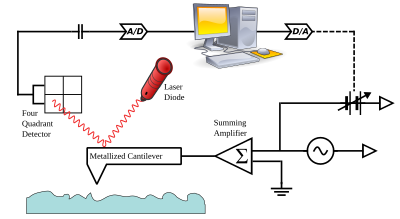
The cantilever in the AFM is a reference electrode that forms a capacitor with the surface, over which it is scanned laterally at a constant separation. The cantilever is not piezoelectrically driven at its mechanical resonance frequency ω0 as in normal AFM although an alternating current (AC) voltage is applied at this frequency.
When there is a direct-current (DC) potential difference between the tip and the surface, the AC+DC voltage offset will cause the cantilever to vibrate. The origin of the force can be understood by considering that the energy of the capacitor formed by the cantilever and the surface is
plus terms at DC. Only the cross-term proportional to the VDC·VAC product is at the resonance frequency ω0. The resulting vibration of the cantilever is detected using usual scanned-probe microscopy methods (typically involving a diode laser and a four-quadrant detector). A null circuit is used to drive the DC potential of the tip to a value which minimizes the vibration. A map of this nulling DC potential versus the lateral position coordinate therefore produces an image of the work function of the surface.
A related technique, electrostatic force microscopy (EFM), directly measures the force produced on a charged tip by the electric field emanating from the surface. EFM operates much like magnetic force microscopy in that the frequency shift or amplitude change of the cantilever oscillation is used to detect the electric field. However, EFM is much more sensitive to topographic artifacts than KPFM. Both EFM and KPFM require the use of conductive cantilevers, typically metal-coated silicon or silicon nitride. Another AFM-based technique for the imaging of electrostatic surface potentials, scanning quantum dot microscopy, quantifies surface potentials based on their ability to gate a tip-attached quantum dot.
Factors affecting SKP measurements
The quality of an SKP measurement is affected by a number of factors. This includes the diameter of the SKP probe, the probe to sample distance, and the material of the SKP probe. The probe diameter is important in the SKP measurement because it affects the overall resolution of the measurement, with smaller probes leading to improved resolution. On the other hand, reducing the size of the probe causes an increase in fringing effects which reduces the sensitivity of the measurement by increasing the measurement of stray capacitances. The material used in the construction of the SKP probe is important to the quality of the SKP measurement. This occurs for a number of reasons. Different materials have different work function values which will affect the contact potential measured. Different materials have different sensitivity to humidity changes. The material can also affect the resulting lateral resolution of the SKP measurement. In commercial probes tungsten is used, though probes of platinum, copper, gold, and NiCr has been used. The probe to sample distance affects the final SKP measurement, with smaller probe to sample distances improving the lateral resolution and the signal-to-noise ratio of the measurement. Furthermore, reducing the SKP probe to sample distance increases the intensity of the measurement, where the intensity of the measurement is proportional to 1/d2, where d is the probe to sample distance. The effects of changing probe to sample distance on the measurement can be counteracted by using SKP in constant distance mode.
Work function
The Kelvin probe force microscope or Kelvin force microscope (KFM) is based on an AFM set-up and the determination of the work function is based on the measurement of the electrostatic forces between the small AFM tip and the sample. The conducting tip and the sample are characterized by (in general) different work functions, which represent the difference between the Fermi level and the vacuum level for each material. If both elements were brought in contact, a net electric current would flow between them until the Fermi levels were aligned. The difference between the work functions is called the contact potential difference and is denoted generally with VCPD. An electrostatic force exists between tip and sample, because of the electric field between them. For the measurement a voltage is applied between tip and sample, consisting of a DC-bias VDC and an AC-voltage VAC sin(ωt) of frequency ω.
Tuning the AC-frequency to the resonant frequency of the AFM cantilever results in an improved sensitivity. The electrostatic force in a capacitor may be found by differentiating the energy function with respect to the separation of the elements and can be written as
where C is the capacitance, z is the separation, and V is the voltage, each between tip and surface. Substituting the previous formula for voltage (V) shows that the electrostatic force can be split up into three contributions, as the total electrostatic force F acting on the tip then has spectral components at the frequencies ω and 2ω.
The DC component, FDC, contributes to the topographical signal, the term Fω at the characteristic frequency ω is used to measure the contact potential and the contribution F2ω can be used for capacitance microscopy.
Contact potential measurements
For contact potential measurements a lock-in amplifier is used to detect the cantilever oscillation at ω. During the scan VDC will be adjusted so that the electrostatic forces between the tip and the sample become zero and thus the response at the frequency ω becomes zero. Since the electrostatic force at ω depends on VDC − VCPD, the value of VDC that minimizes the ω-term corresponds to the contact potential. Absolute values of the sample work function can be obtained if the tip is first calibrated against a reference sample of known work function. Apart from this, one can use the normal topographic scan methods at the resonance frequency ω independently of the above. Thus, in one scan, the topography and the contact potential of the sample are determined simultaneously. This can be done in (at least) two different ways: 1) The topography is captured in AC mode which means that the cantilever is driven by a piezo at its resonant frequency. Simultaneously the AC voltage for the KPFM measurement is applied at a frequency slightly lower than the resonant frequency of the cantilever. In this measurement mode the topography and the contact potential difference are captured at the same time and this mode is often called single-pass. 2) One line of the topography is captured either in contact or AC mode and is stored internally. Then, this line is scanned again, while the cantilever remains on a defined distance to the sample without a mechanically driven oscillation but the AC voltage of the KPFM measurement is applied and the contact potential is captured as explained above. It is important to note that the cantilever tip must not be too close to the sample in order to allow good oscillation with applied AC voltage. Therefore, KPFM can be performed simultaneously during AC topography measurements but not during contact topography measurements.
Applications
The Volta potential measured by SKP is directly proportional to the corrosion potential of a material, as such SKP has found widespread use in the study of the fields of corrosion and coatings. In the field of coatings for example, a scratched region of a self-healing shape memory polymer coating containing a heat generating agent on aluminium alloys was measured by SKP. Initially after the scratch was made the Volta potential was noticeably higher and wider over the scratch than over the rest of the sample, implying this region is more likely to corrode. The Volta potential decreased over subsequent measurements, and eventually the peak over the scratch completely disappeared implying the coating has healed. Because SKP can be used to investigate coatings in a non-destructive way it has also been used to determine coating failure. In a study of polyurethane coatings, it was seen that the work function increases with increasing exposure to high temperature and humidity. This increase in work function is related to decomposition of the coating likely from hydrolysis of bonds within the coating.
Using SKP the corrosion of industrially important alloys has been measured. In particular with SKP it is possible to investigate the effects of environmental stimulus on corrosion. For example, the microbially induced corrosion of stainless steel and titanium has been examined. SKP is useful to study this sort of corrosion because it usually occurs locally, therefore global techniques are poorly suited. Surface potential changes related to increased localized corrosion were shown by SKP measurements. Furthermore, it was possible to compare the resulting corrosion from different microbial species. In another example SKP was used to investigate biomedical alloy materials, which can be corroded within the human body. In studies on Ti-15Mo under inflammatory conditions, SKP measurements showed a lower corrosion resistance at the bottom of a corrosion pit than at the oxide protected surface of the alloy. SKP has also been used to investigate the effects of atmospheric corrosion, for example to investigate copper alloys in marine environment. In this study Kelvin potentials became more positive, indicating a more positive corrosion potential, with increased exposure time, due to an increase in thickness of corrosion products. As a final example SKP was used to investigate stainless steel under simulated conditions of gas pipeline. These measurements showed an increase in difference in corrosion potential of cathodic and anodic regions with increased corrosion time, indicating a higher likelihood of corrosion. Furthermore, these SKP measurements provided information about local corrosion, not possible with other techniques.
SKP has been used to investigate the surface potential of materials used in solar cells, with the advantage that it is a non-contact, and therefore a non-destructive technique. It can be used to determine the electron affinity of different materials in turn allowing the energy level overlap of conduction bands of differing materials to be determined. The energy level overlap of these bands is related to the surface photovoltage response of a system.
As a non-contact, non-destructive technique SKP has been used to investigate latent fingerprints on materials of interest for forensic studies. When fingerprints are left on a metallic surface they leave behind salts which can cause the localized corrosion of the material of interest. This leads to a change in Volta potential of the sample, which is detectable by SKP. SKP is particularly useful for these analyses because it can detect this change in Volta potential even after heating, or coating by, for example, oils.
SKP has been used to analyze the corrosion mechanisms of schreibersite-containing meteorites. The aim of these studies has been to investigate the role in such meteorites in releasing species utilized in prebiotic chemistry.
In the field of biology SKP has been used to investigate the electric fields associated with wounding, and acupuncture points.
In the field of electronics, KPFM is used to investigate the charge trapping in High-k gate oxides/interfaces of electronic devices.
![{\displaystyle E={\frac {1}{2}}C[V_{DC}+V_{AC}\sin(\omega _{0}t)]^{2}={\frac {1}{2}}C[2V_{DC}V_{AC}\sin(\omega _{0}t)-{\frac {1}{2}}V_{AC}^{2}\cos(2\omega _{0}t)]}](https://wikimedia.org/api/rest_v1/media/math/render/svg/76406b6101633873a2d25b45bd1f08ff43d7c571)


![{\displaystyle F_{DC}={\frac {dC}{dz}}\left[{\frac {1}{2}}(V_{DC}-V_{CPD})^{2}+{\frac {1}{4}}V_{AC}^{2}\right]}](https://wikimedia.org/api/rest_v1/media/math/render/svg/86b07fe8708356480525c3eeff00a115029218c6)
![{\displaystyle F_{\omega }={\frac {dC}{dz}}[V_{DC}-V_{CPD}]V_{AC}\sin(\omega t)}](https://wikimedia.org/api/rest_v1/media/math/render/svg/1826a211f72a4518e388609ea082454aba51239f)

