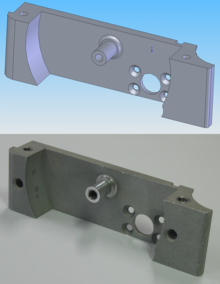
CAD model and CNC machined part
Computer-aided manufacturing (CAM) also known as Computer-aided Modeling or Computer-aided Machining is the use of software to control machine tools and related ones in the manufacturing of work pieces. This is not the only definition for CAM, but it is the most common;
CAM may also refer to the use of a computer to assist in all operations
of a manufacturing plant, including planning, management,
transportation and storage.
Its primary purpose is to create a faster production process and
components and tooling with more precise dimensions and material
consistency, which in some cases, uses only the required amount of raw
material (thus minimizing waste), while simultaneously reducing energy
consumption.
CAM is now a system used in schools and lower educational purposes.
CAM is a subsequent computer-aided process after computer-aided design (CAD) and sometimes computer-aided engineering
(CAE), as the model generated in CAD and verified in CAE can be input
into CAM software, which then controls the machine tool. CAM is used in
many schools alongside Computer-Aided Design (CAD) to create objects.
Overview
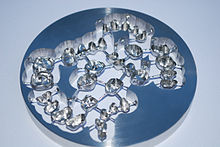
Chrome-cobalt disc with crowns for dental implants, manufactured using WorkNC CAM
Traditionally, CAM has been considered a numerical control (NC) programming tool, wherein two-dimensional (2-D) or three-dimensional (3-D) models of components are generated in CAD. As with other “Computer-Aided” technologies, CAM does not eliminate the need for skilled professionals such as manufacturing engineers, NC programmers, or machinists.
CAM leverages both the value of the most skilled manufacturing
professionals through advanced productivity tools, while building the
skills of new professionals through visualization, simulation and
optimization tools.
History
Early commercial applications of CAM were in large companies in the automotive and aerospace industries; for example, Pierre Béziers work developing the CAD/CAM application UNISURF in the 1960s for car body design and tooling at Renault.
Historically, CAM software was seen to have several shortcomings
that necessitated an overly high level of involvement by skilled CNC
machinists. Fallows created the first CAD software but this had severe
shortcomings and was promptly taken back into the developing stage. CAM software would output code for the least capable machine, as each machine tool control added on to the standard G-code
set for increased flexibility. In some cases, such as improperly set
up CAM software or specific tools, the CNC machine required manual
editing before the program will run properly. None of these issues were
so insurmountable that a thoughtful engineer or skilled machine
operator could not overcome for prototyping or small production runs;
G-Code is a simple language. In high production or high precision
shops, a different set of problems were encountered where an experienced
CNC machinist must both hand-code programs and run CAM software.
The integration of CAD with other components of CAD/CAM/CAE Product lifecycle management (PLM) environment requires an effective CAD data exchange. Usually it had been necessary to force the CAD operator to export the data in one of the common data formats, such as IGES or STL or Parasolid
formats that are supported by a wide variety of software.
The output from the CAM software is usually a simple text file of
G-code/M-codes, sometimes many thousands of commands long, that is then
transferred to a machine tool using a direct numerical control (DNC) program or in modern Controllers using a common USB Storage Device.
CAM packages could not, and still cannot, reason as a machinist
can. They could not optimize toolpaths to the extent required of mass production.
Users would select the type of tool, machining process and paths to be
used. While an engineer may have a working knowledge of G-code
programming, small optimization and wear issues compound over time.
Mass-produced items that require machining are often initially created
through casting or some other non-machine method. This enables
hand-written, short, and highly optimized G-code that could not be
produced in a CAM package.
At least in the United States, there is a shortage of young,
skilled machinists entering the workforce able to perform at the
extremes of manufacturing; high precision and mass production.
As CAM software and machines become more complicated, the skills
required of a machinist or machine operator advance to approach that of a
computer programmer and engineer rather than eliminating the CNC
machinist from the workforce.
Typical areas of concern:
- High-Speed Machining, including streamlining of tool paths
- Multi-function Machining
- 5 Axis Machining
- Feature recognition and machining
- Automation of Machining processes
- Ease of Use
Overcoming historical shortcomings
Over
time, the historical shortcomings of CAM are being attenuated, both by
providers of niche solutions and by providers of high-end solutions.
This is occurring primarily in three arenas:
- Ease of usage
- Manufacturing complexity
- Integration with PLM and the extended enterprise
- Ease in use
- For the user who is just getting started as a CAM user, out-of-the-box capabilities providing Process Wizards, templates, libraries, machine tool kits, automated feature based machining and job function specific tailorable user interfaces build user confidence and speed the learning curve.
- User confidence is further built on 3D visualization through a closer integration with the 3D CAD environment, including error-avoiding simulations and optimizations.
- Manufacturing complexity
- The manufacturing environment is increasingly complex. The need for CAM and PLM tools by the manufacturing engineer, NC programmer or machinist is similar to the need for computer assistance by the pilot of modern aircraft systems. The modern machinery cannot be properly used without this assistance.
- Today's CAM systems support the full range of machine tools including: turning, 5 axis machining, waterjet, laser / plasma cutting, and wire EDM. Today’s CAM user can easily generate streamlined tool paths, optimized tool axis tilt for higher feed rates, better tool life and surface finish, and ideal cutting depth. In addition to programming cutting operations, modern CAM softwares can additionally drive non-cutting operations such as machine tool probing.
- Integration with PLM and the extended enterpriseLM to integrate manufacturing with enterprise operations from concept through field support of the finished product.
- To ensure ease of use appropriate to user objectives, modern CAM solutions are scalable from a stand-alone CAM system to a fully integrated multi-CAD 3D solution-set. These solutions are created to meet the full needs of manufacturing personnel including part planning, shop documentation, resource management and data management and exchange. To prevent these solutions from detailed tool specific information a dedicated tool management
Machining process
Most machining progresses through many stages,
each of which is implemented by a variety of basic and sophisticated
strategies, depending on the part design, material, and software
available.
- Roughing
- This process usually begins with raw stock, known as billet, or a rough casting which a CNC machine cuts roughly to shape of the final model, ignoring the fine details. In milling, the result often gives the appearance of terraces or steps, because the strategy has taken multiple "steps" down the part as it removes material. This takes the best advantage of the machine's ability by cutting material horizontally. Common strategies are zig-zag clearing, offset clearing, plunge roughing, rest-roughing, and trochoidal milling (adaptive clearing). The goal at this stage is to remove the most material in the least time, without much concern for overall dimensional accuracy. When roughing a part, a small amount of extra material is purposely left behind to be removed in subsequent finishing operation(s).
- Semi-finishing
- This process begins with a roughed part that unevenly approximates the model and cuts to within a fixed offset distance from the model. The semi-finishing pass must leave a small amount of material (called the scallop) so the tool can cut accurately, but not so little that the tool and material deflect away from the cutting surfaces. Common strategies are raster passes, waterline passes, constant step-over passes, pencil milling.
- Finishing
- Finishing involves many light passes across the material in fine steps to produce the finished part. When finishing a part, the steps between passes is minimal to prevent tool deflection and material spring back. In order to reduce the lateral tool load, tool engagement is reduced, while feed rates and spindle speeds are generally increased in order to maintain a target surface speed (SFM). A light chip load at high feed and RPM is often referred to as High Speed Machining (HSM), and can provide quick machining times with high quality results. The result of these lighter passes is a highly accurate part, with a uniformly high surface finish. In addition to modifying speeds and feeds, machinists will often have finishing specific endmills, which never used as roughing endmills. This is done to protect the endmill from developing chips and flaws in the cutting surface, which would leave streaks and blemishes on the final part.
- Contour milling
- In milling applications on hardware with four or more axes, a separate finishing process called contouring can be performed. Instead of stepping down in fine-grained increments to approximate a surface, the work piece is rotated to make the cutting surfaces of the tool tangent to the ideal part features. This produces an excellent surface finish with high dimensional accuracy. This process is commonly used to machine complex organic shapes such as turbine and impeller blades, which due to their complex curves and overlapping geometry, are impossible to machine with only three axis machines.


